Showing posts with label crafts. Show all posts

Saturday, March 30, 2013

Bluegrass Saturday...Baby Chicks!

What would be awesome? 
Raising chickens in your own backyard. 
I hope to do so someday, but until then I will vicariously live through those I know who have their own chickens. I think it's wonderful that more and more people are getting backyard flocks, especially in the city. My mom got 6 egg laying chickens this year and 3 meat chickens. In addition, a couple of my coworkers got chicks this week! 
Today Megan had a Baby (Chick) Shower for her little ones. We held the babes, dyed some eggs and ate some yummy food.

This morning I hard boiled a bunch of eggs to bring...while listening to Bluegrass Saturday Morning of course.

Shortly after the eggs were done, Sebastian woke up for the day. We have been offering him solids at least daily and he is doing better all the time. We are trying new foods every 3 days or so. We tried oatmeal for the first time this morning and he liked it! Surprising because it is a little chunkier then most other things he has tried. I decided to make a list of things that he can currently eat because I keep forgetting what we have tried!

When he was done eating, I made some banana bread to bring along to the party. 
Good tip for storing ripe bananas for baking? 
You can just throw the entire banana in the freezer when it gets really ripe. Then when you need to use them, just let them sit on the counter and thaw for a bit, then gently squeeze and out pops the smooshed, ripe banana.

I used eggs from my moms chickens to make the bread. 
Bread made with local chicken eggs to go meet more local chickens!

It's not easy to ignore the 6 eyes watching my every move as I work in the kitchen. 

Off to Megan's to meet the chicks! 

Megan and some little balls of fluff.

Meet Flour...

...Crocodile...

 ...and Alder.

We also dyed a bunch of eggs. We used a couple methods. 
Marbleized eggs and silk-dyed eggs

The silk-dyed eggs are very easy and so neat when done. 


Sebastian came along to check out the chicks too. He is no longer such a little chicken himself. He is a lap-full of soft, chubby rolls.
Just as he should be.


Check out Megan's blog here. You can learn more about having your own chickens in the city on this post.

 Hope you have a good holiday weekend!


Saturday, December 10, 2011

Homemade Holiday Decor

As soon as I discovered that the bush on the side of our house has branches that look like little trees, I knew I had to create something with them. Well, how about a holiday centerpiece for our dining room table? Yes!
This is the type of project that could be recreated in many different ways depending on your taste. This is how I created it.


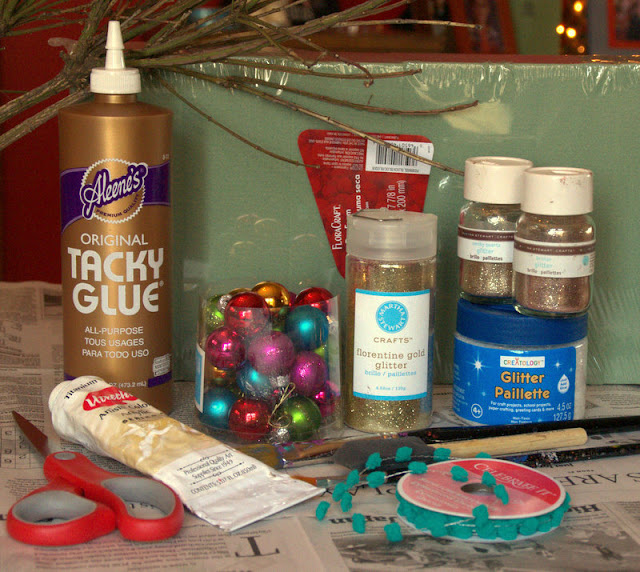
Here are the supplies you will need if you decide to make one like mine:
- branches
- dry craft foam
- glue
- newspaper
- scissors
- white paint
- paint brushes
- funky ribbon
- lots of glitter
- mini ornaments
There are a few things not pictured above that I found helpful as I created since I was winging this:
- tape
- twine

First, create a base. Glue together the foam pieces to create a shape you want. I used 5 bricks (~3x3.5x8 each) to create my base. After gluing them together, lay them on a flat surface to dry. You can also buy one bigger foam piece and shape it to your liking, I thought the big pieces were to expensive so I connected little ones.

Next, wrap your foam in newspaper to keep it from shedding foam bits. Make sure to put the side with tape face down so that when you put in the branches, the tape is not in the way. Then wrap in whatever you would like! I decided to leave mine covered in just newspaper cause I'm a fan of the newspaper look. But, you could wrap yours in anything really, burlap, dry moss, wrapping paper, fabric, etc. Once it's wrapped, insert the branches. Just poke them right in and make sure not to go all the way through the foam, that will decrease stability.

After putting the branches in, gently pull out each one, fill the hole with glue and carefully push the branch back in.

Time to paint! I chose to use white acrylic paint so it would look like snow, but you can really paint them any color with any type of paint. Just keep adding paint until it looks right to you.

Then comes the glitter...glitter everywhere! I started by mixing a little of my glue with water to make it thinner. Then I sponged it onto the branches and base and sprinkled glitter all over. Soon I was just adding glitter to my glue slurry and painting that on...the more glitter the better. Then you can use the acrylic white paint to make little white mounds on the base and sprinkle them with white glitter.

Just glitter and paint till you like it.

Add whatever type of string or ribbon you would like to the base and hang the ornaments.

And your done! I plan on adding some little snowmen or something to the base of mine. 
Now, go make one! It is fun and easy and the only thing that I needed to buy was the foam...so cheap too! I bet that you have most of these supplies in your home as well. And if you don't have a bush that creates little tree-looking branches, well any branch will do!

I hope you all are enjoying the holidays so far, they are my favorite!
Tomorrow the holidays at our home will get even merrier...we are getting another dog! You will have to check back in...I am sure his homecoming will be worth a post :)